
 |
 |
| image credit |
Supplies For Making One Trellis
 |
| supplies needed outside |
- pencil
- tape measure
- eight #6 3/4" zinc wood screws
- four #8 X 2" outdoor wood screws
- drill and drill bits
- two 1 1/2" angle brackets #1 (found by the decking department at my Home Depot store) mine were $.60 a piece
- Three 7/8" x 2" x 8'cedar boards (I got mine at Home Depot for $1.75 a piece)
- I cut two of my boards to 6ft so that they would fit in our car. You can keep the length of 8 ft if you want or cut two boards shorter if you want. Just remember that you will lose some length installing your trellis.
- Cut one board in half to make your horizontal boards (it will be 4ft wide). If you want your trellis wider buy your board longer. Don't forget you can have your boards cut at most stores. Just ask an employee.
- a miter box and a hand saw
- a surface to clamp your boards and miter box on to (I used my work bench)
- 3 clamps that are big enough to clamp your miter box to your working surface. If you don't have any and want to get some on the cheap (like $.50-$1) check your local estate sales. I check them out for tools often and clamps are very common at most.
- metal file (optional to take off rough edges so you don't get splinters) You can also find these at estate sales usually (that's where I got mine) for $1 or less.
- Phillip's screwdriver (optional)

- Clamp your miter box to your working surface (if you don't have a work bench, you can use a counter or table) and your board in the miter box (see above photo).
- Cut the ends of your two long boards at a 45 degree angle (this will be the bottom of the trellis). You will need to stop before you can finish the cut and finish the cut without the miter box (Follow the picture below). Remember you will be making one cut on each of your long boards, Only on the bottom not the top. Use a metal file or sandpaper to smooth over any rough edges to make sure you don't get splinters installing or removing your trellis in the future.

- Cut on of your boards in half if you did not have them cut it at the store. At this pint you should have two boards 4 ft long, and two boards 6-8 ft long (depending on how tall you want it to be) with the bottom of each cut 45 degrees.
- Take your work outside if you can. It will be hard to work on it inside at this point. Start by laying out your boards in the shape it will be when finished.

- Measure and mark where you want the horizontal brace to go on both sides. I measured 40" down (the height of mine was 6') so that the horizontal brace would rest just before our chicken wire fence.
- Drill pilot holes with a small drill in corners and by pencil your marks (mine was at 40").

- Change your drill bit to a screw driver bit that fits the head of your #8 two inch screws and hold your joints together with your fingers and screw in the joints where your pilot holes are on each end of the top

- do the same for the horizontal brace as pictured below.

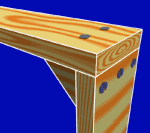
- Put your angle brace into position you want it in top joint as pictured below and drill a small pilot hole where each screw will go and screw in with 3/4" screws. I used a philips screw driver to screw in the screws instead of my drill, because I found it was easier to control.

- You can stop here and either attach a netting to the trellis, tie on twine as needed (this is what I'm doing), or you could drill holes on the top, horizontal brace, and sides and then put string through it like the vegetable gardener did (pictured below).
 |
| free trellis plan that attaches to raised beds by the Vegetable Gardener |
 |
| my finished trellis, I tied twine to it once I put it in the garden |
Installation
tools
- step stool
- mallet (metal is preferred)
- thick gloves (I hit my thumb installing it and cut myself when I smashed it with the mallet)
- a scrap board of similar width and a small c clamp
- My neighbor suggested clamping a piece of scrap wood on top of the top joint when pounding it in. This will help distribute the weight all over better so your joint is less likely to split while installing it.
- Position your trellis where you want it, make sure to have it at least 4" away from the edge of your planting square or space. I didn't and I'm wishing I had now that everything is growing it's shrunk our gardens pathways!
- Clamp your scrap wood to the top of your trellis and covering the butt joint. Position your step stool near the joint and pound the post in with your mallet, then do the same to the other post. Keep repeating until the post seems sturdy and even.


0 comments